Guide · Shopify
38 Use Hashentic with Shopify
Install the Hashentic app from the Shopify App Store, protect your products, issue a QR code for every unit sold and show a “Verify authenticity” block on your product pages.
The Shopify app creates and runs a Hashentic account for your store. Everything you do in the app also appears in your Hashentic admin panel, which stays available for the advanced features (page templates, fraud alerts, workflows, NFC tags). The app follows the language of your Shopify admin: English, German, Spanish, French, Polish, Portuguese, Russian or Chinese, and English for any other language.
Activate#
- Install Hashentic from the Shopify App Store and open it from Apps in your Shopify admin.
- Read the Terms of Service and the Privacy Policy, tick the box and click Activate Hashentic. Activating accepts the terms for your business, so only the store owner can do it; staff see a note to ask the owner.
- Wait one to three minutes while your account is created. The app shows each step; you can leave the page.
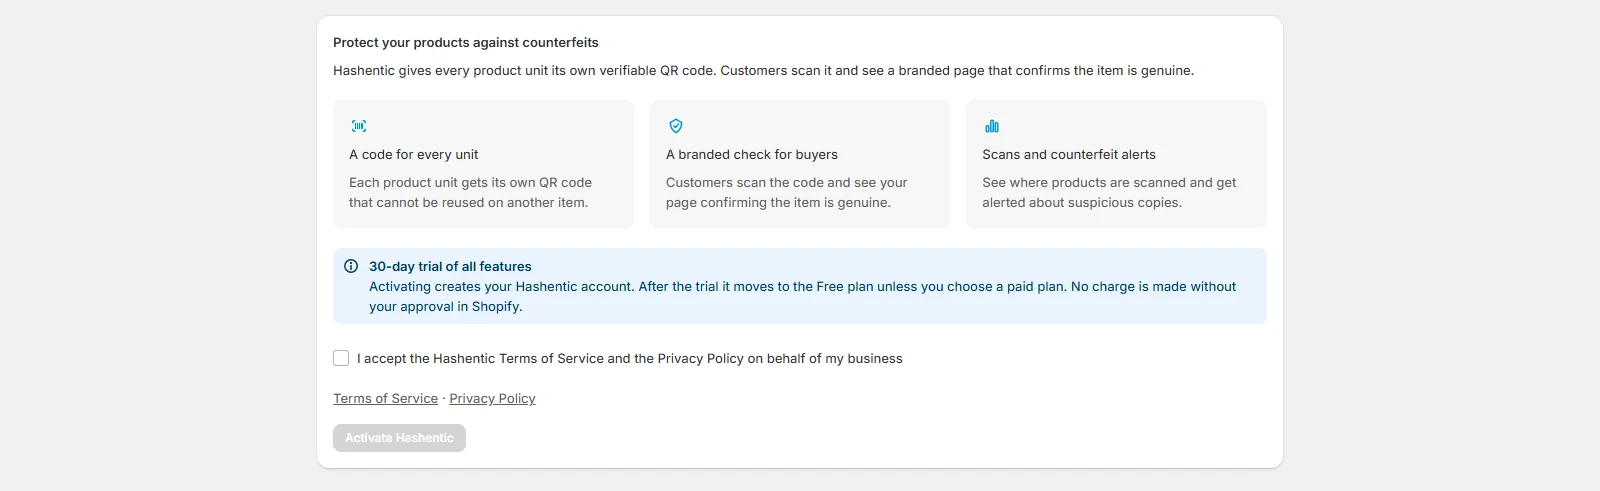
If setup takes longer than 10 minutes, the Home page shows the warning Setup is taking longer than usual. You do not need to do anything: setup keeps retrying in the background. If the account is still not ready after an hour, use the support link in the warning.
Once the account is ready, the Home page shows a Get started checklist with the next steps.
Your account starts with a trial (30 days unless set otherwise) and then moves to the Free plan unless you choose a
paid plan. Its address is your shop name with a short random suffix, for example acme-k7mq.hashentic.com.
Well-known brand names get a neutral address. To use your brand name, open Settings and click
Request a custom subdomain; we check the request by hand.
The store owner receives a welcome e-mail with the sign-in details of the Hashentic admin panel.
Protect products and issue codes#
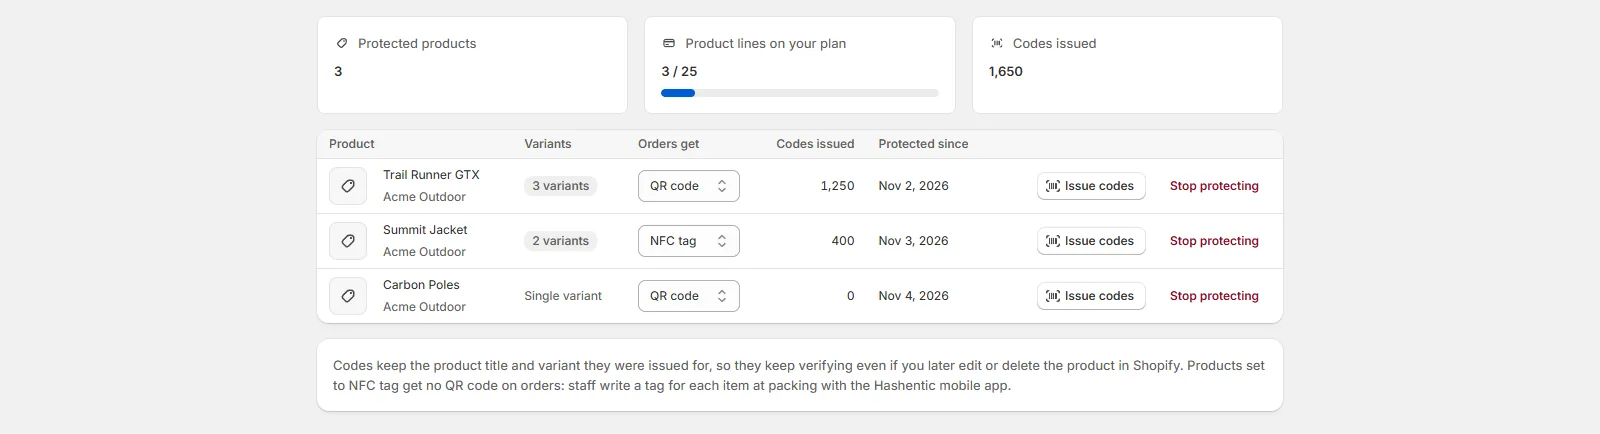
- Open Protected products and click Protect products. Pick up to 50 products at a time in the Shopify product picker. Each product becomes a product line in Hashentic; your plan limits how many you can protect. Long lists are split into pages and get a search field.
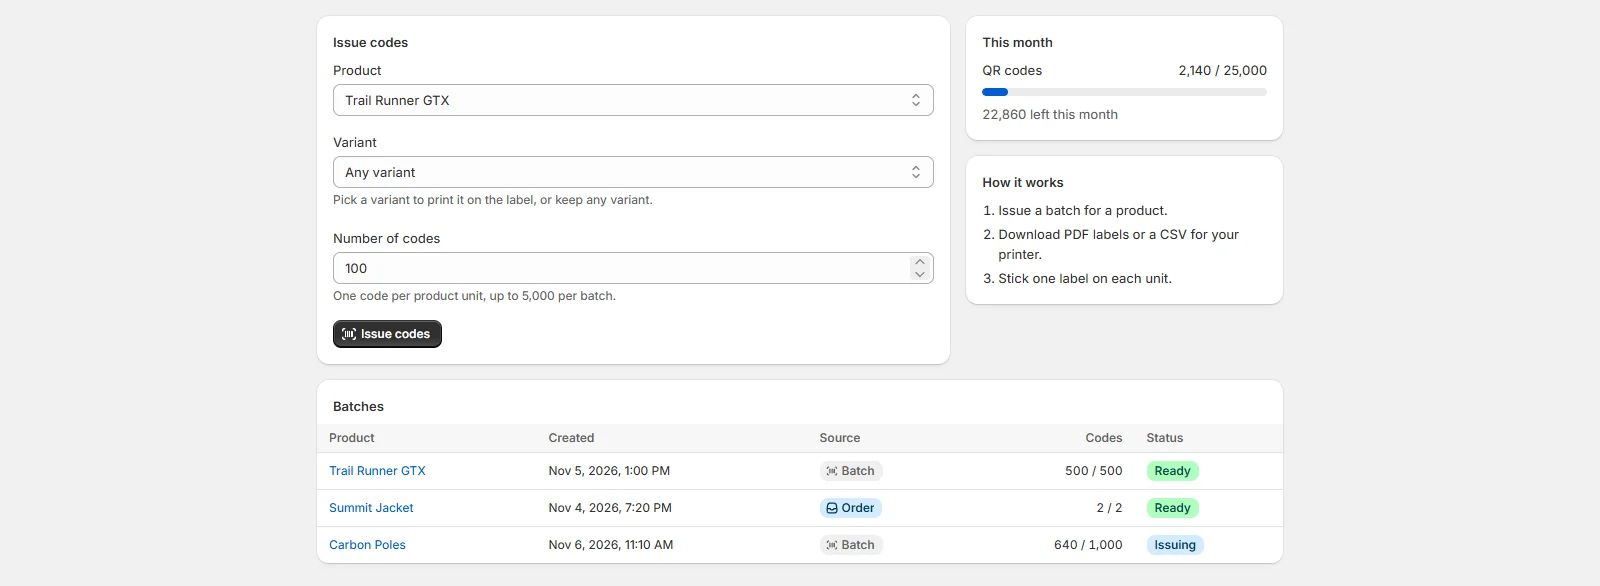
- Open Codes, choose the product (and a variant if you sell several), enter the Number of codes and click Issue codes. Before issuing, the app asks you to confirm: the dialog shows how many codes you are about to issue and how many QR codes are left this month.
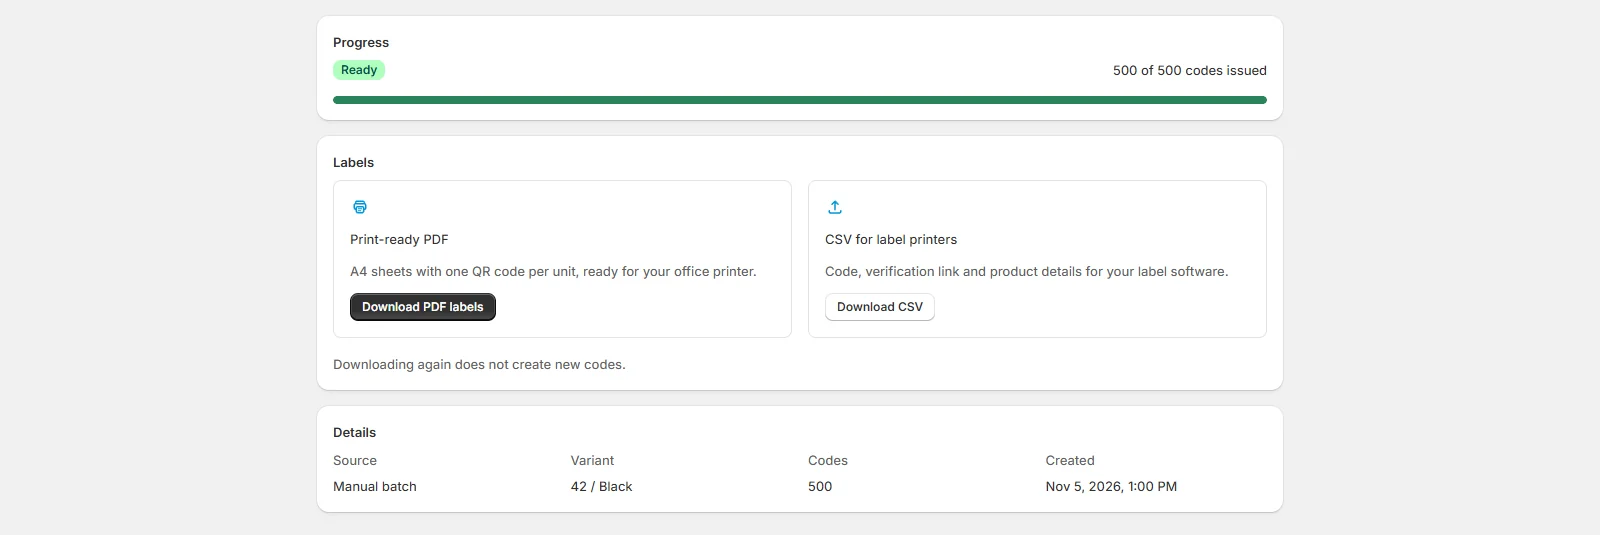
- When the batch shows Ready, click Download PDF labels for print-ready A4 sheets, or Download CSV for your label printer. A large PDF shows its progress while it is created; Cancel stops it.
The Codes page lists your batches 25 to a page, newest first; use the page controls under the table. The Source column shows Order for codes issued automatically for an order and Manual batch for batches you issued yourself.
Every code keeps the product title and variant it was issued for. Editing or deleting the product in Shopify never stops a printed code from verifying. Stop protecting asks you to confirm: the product then gets no new codes, and codes already issued for it keep verifying.
Codes for every order#
In Settings choose Issue codes automatically: When an order is paid (the default), When an order is fulfilled or Off — I issue batches myself. Hashentic then issues one code per unit of every protected product on the order.
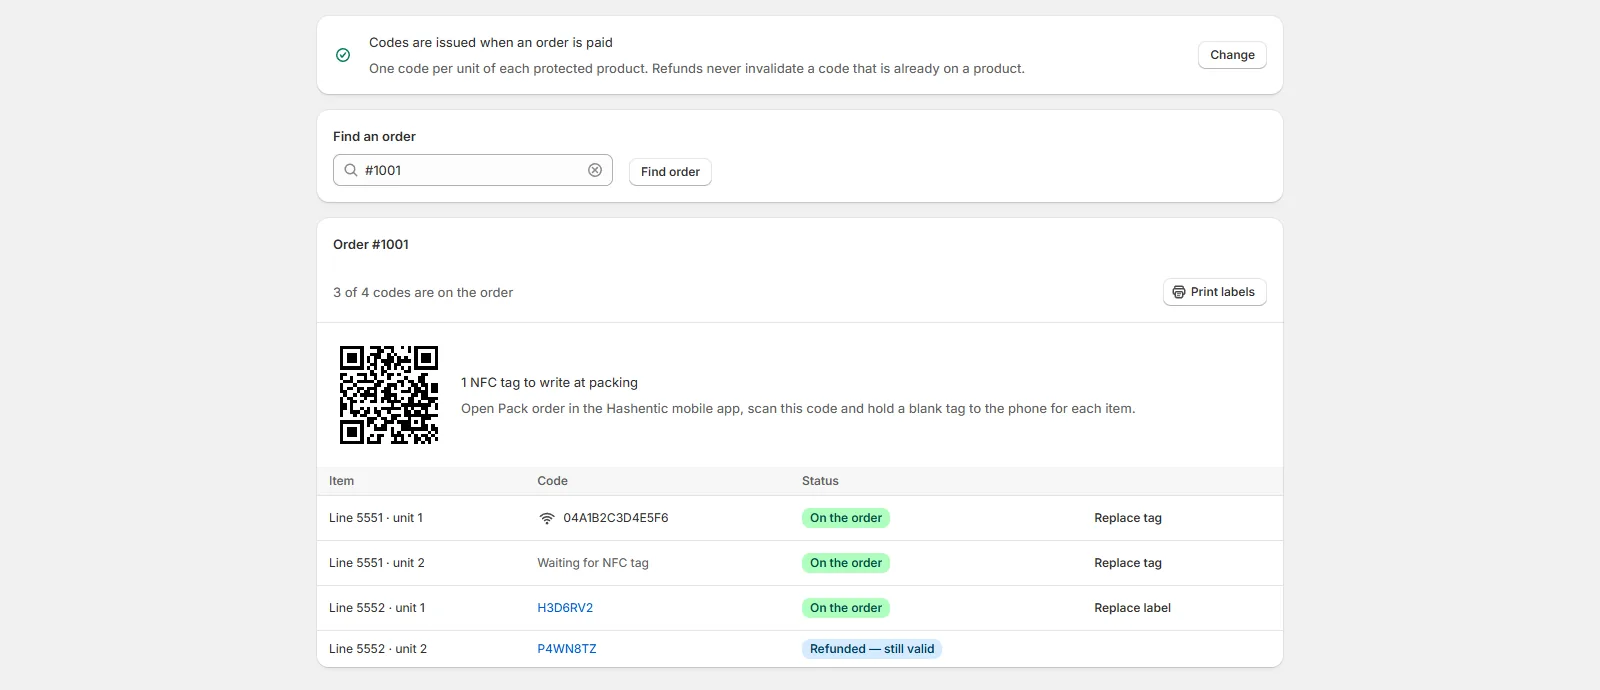
- Open Orders and enter the order number to see its codes and print labels for it. Each unit shows its product and variant, and so does its label, so labels of different products on one order cannot be mixed up. The order number goes into the page address, so the lookup survives a reload and the browser's Back button.
- Click Replace label (Replace tag for an NFC unit) when a label is damaged and confirm. A replacement label gets a new code and uses one QR code of your monthly quota; a replacement NFC unit waits for a new tag, and writing it counts as one NFC write (if your plan no longer includes NFC orders, the replacement is a QR label instead and uses QR quota). The old code or tag keeps verifying. Replace is offered once a unit has its code.
- Looking up an order needs access to orders in Shopify: staff without it see a note instead of the order.
- When an order is edited, codes are added for added units; removed units are marked as released.
- Cancelled units are marked Released and refunded units Refunded — still valid, but their codes are never switched off: a genuine item stays genuine after a refund.
- Hashentic reads only the order lines, products, variants and quantities. It never stores customer names, e-mails or addresses.
Settings uses the Shopify save bar: as soon as you change something, Save and Discard appear, and Shopify warns you if you leave the page with unsaved changes.
NFC tags#
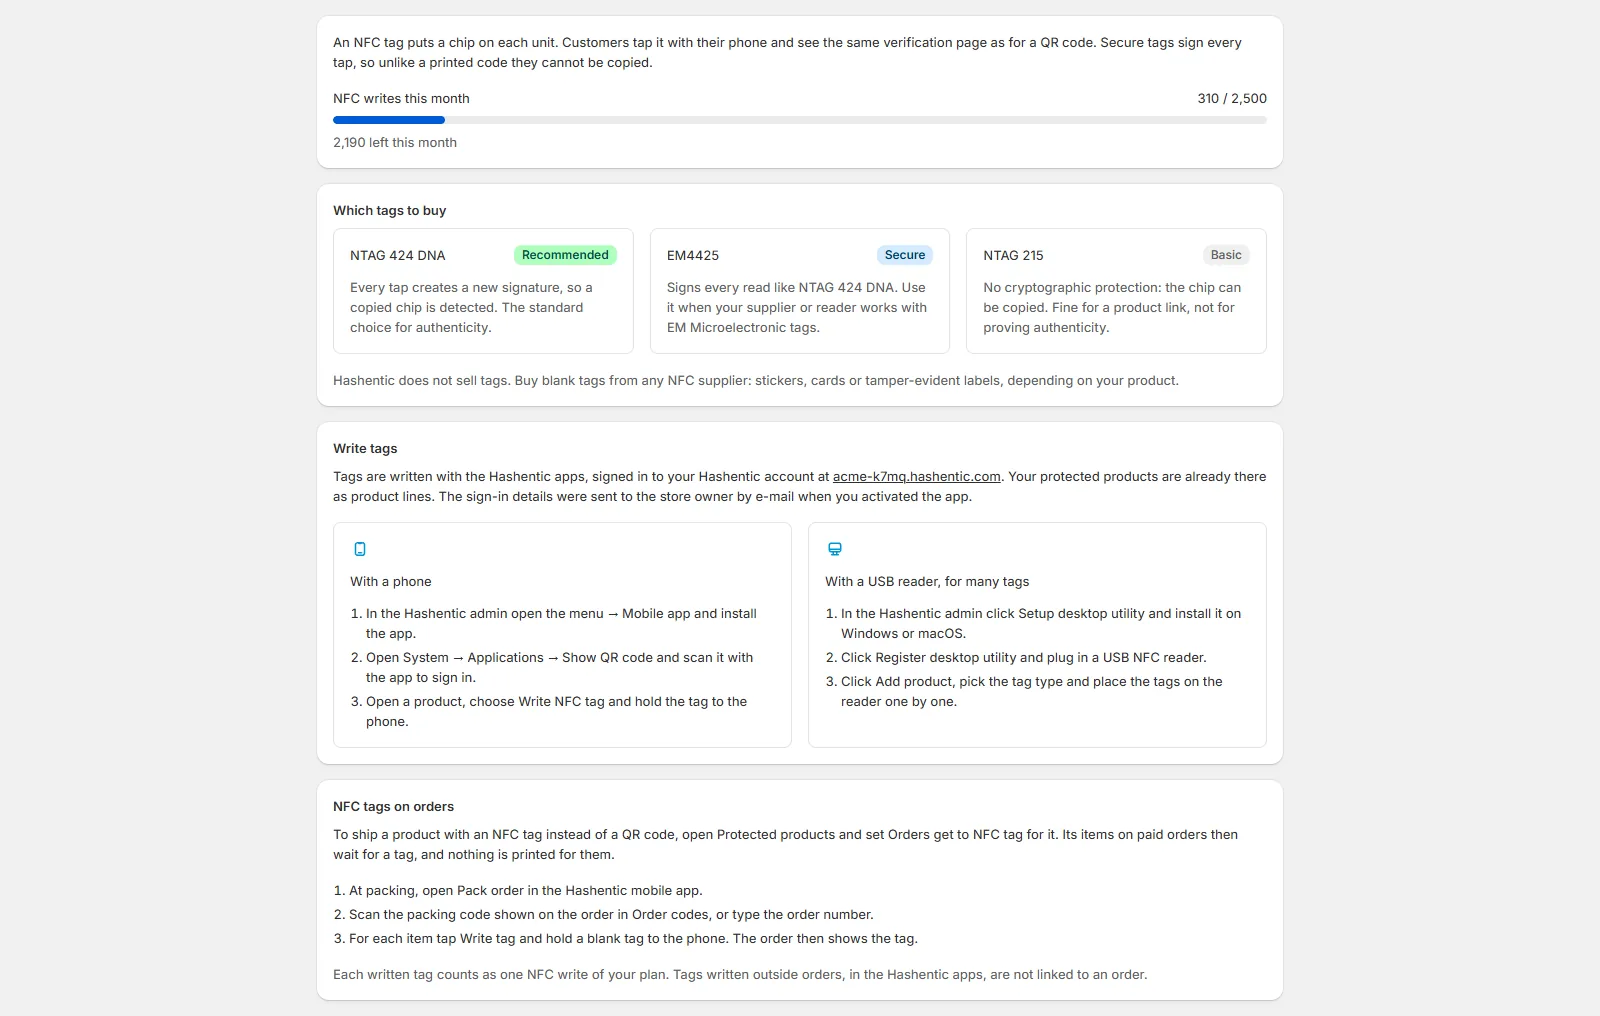
Open NFC tags in the app. It shows how many tags you can write this month, which tags to buy and how to write them. NTAG 424 DNA is recommended: every tap is signed, so a copied chip is detected. EM4425 signs every read too, for suppliers and readers that work with EM Microelectronic tags. NTAG 215 has no copy protection.
Tags are written with the Hashentic mobile app or with the Desktop utility and a USB reader, signed in to your Hashentic account. Your protected products are already there as product lines. Tags written this way are not linked to an order.
NFC tags on orders#
To ship a product with an NFC tag instead of a QR code, open Protected products and set Orders get to NFC tag for it. The Orders get column appears when your plan includes NFC writes. Its units on new orders then get no QR code and wait for a tag; other products on the same order keep their QR codes. With When an order is fulfilled, units of NFC products still appear as soon as the order is paid, so you can tag them at packing; QR codes keep waiting for fulfilment.
- Open the order in Orders. Units of NFC products show Waiting for NFC tag, and the order shows a packing code.
- At packing, open Pack order in the Hashentic mobile app and scan the packing code, or type the order number.
- For each unit tap Write tag and hold a blank tag to the phone. The order in Orders then shows the tag.
Each written tag counts as one NFC write of your plan; units waiting for a tag use no QR codes. Only staff who can write products and can access the product line see the order in the mobile app. Units already on an order keep their type when you switch the product back to QR code.
Product passports#
A product passport is the EU Digital Product Passport of a protected product: who is responsible for it, what it is made of, how to care for it, repair and recycle it. Every code of the product shows the published passport when it is scanned, and machines read the same data as JSON-LD. Passports cover two categories today: General product (ESPR and the General Product Safety Regulation) and Textile and apparel (also the Textile Regulation 1007/2011 and the French AGEC law).
- Open Product passports. Every protected product is listed with its passport state and readiness.
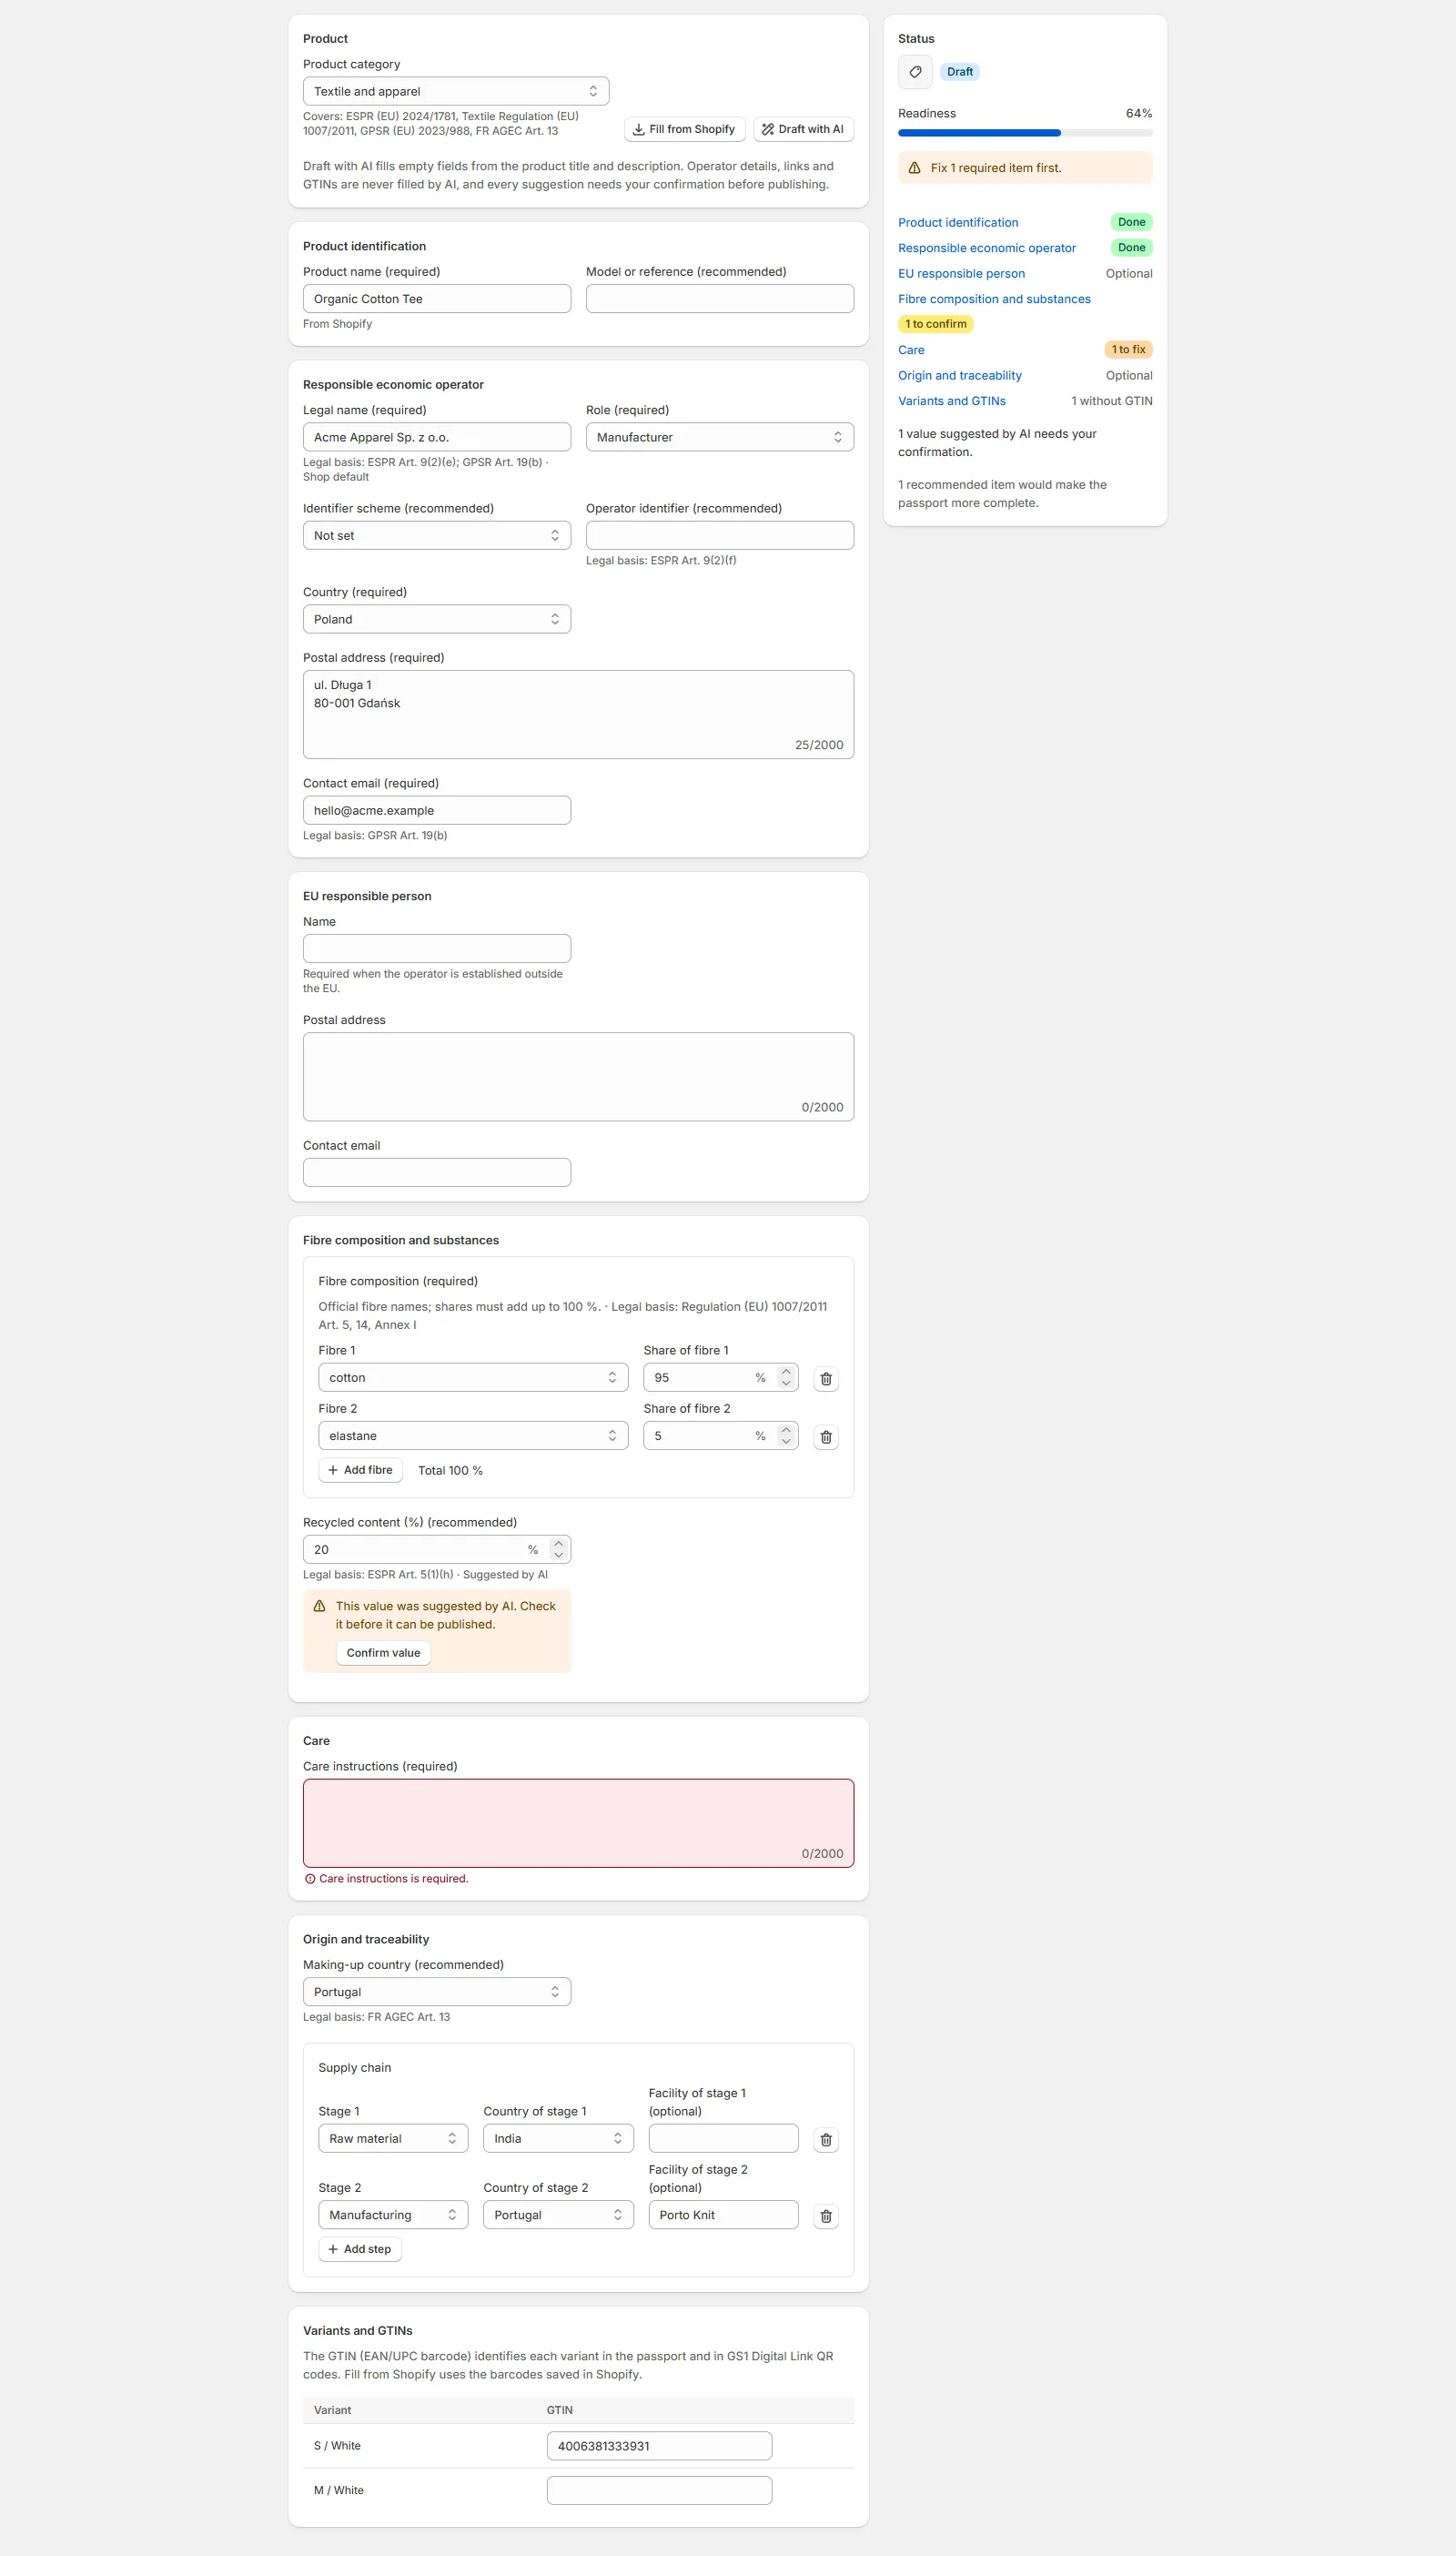
- Click Create passport (or Open passport) and choose the Product category.
- Click Fill from Shopify to copy the product title, description and the barcodes of the variants. Only empty fields are filled; the vendor is never used as the responsible business. To go further, click Draft with AI: AI reads the product title and description and fills empty fields it finds there (see Draft with AI below).
- Fill in the sections. Required fields are marked (required); where a field comes from a regulation, it names the article. A field with a mistake shows what to fix, for example a fibre composition that does not add up to 100 %.
- Click Save draft. The readiness bar shows how complete the passport is; a draft is never shown to customers.
- When nothing required is missing, click Publish and confirm. If Publish is not available, the Status section says why, for example unsaved changes or the required items still to fix.
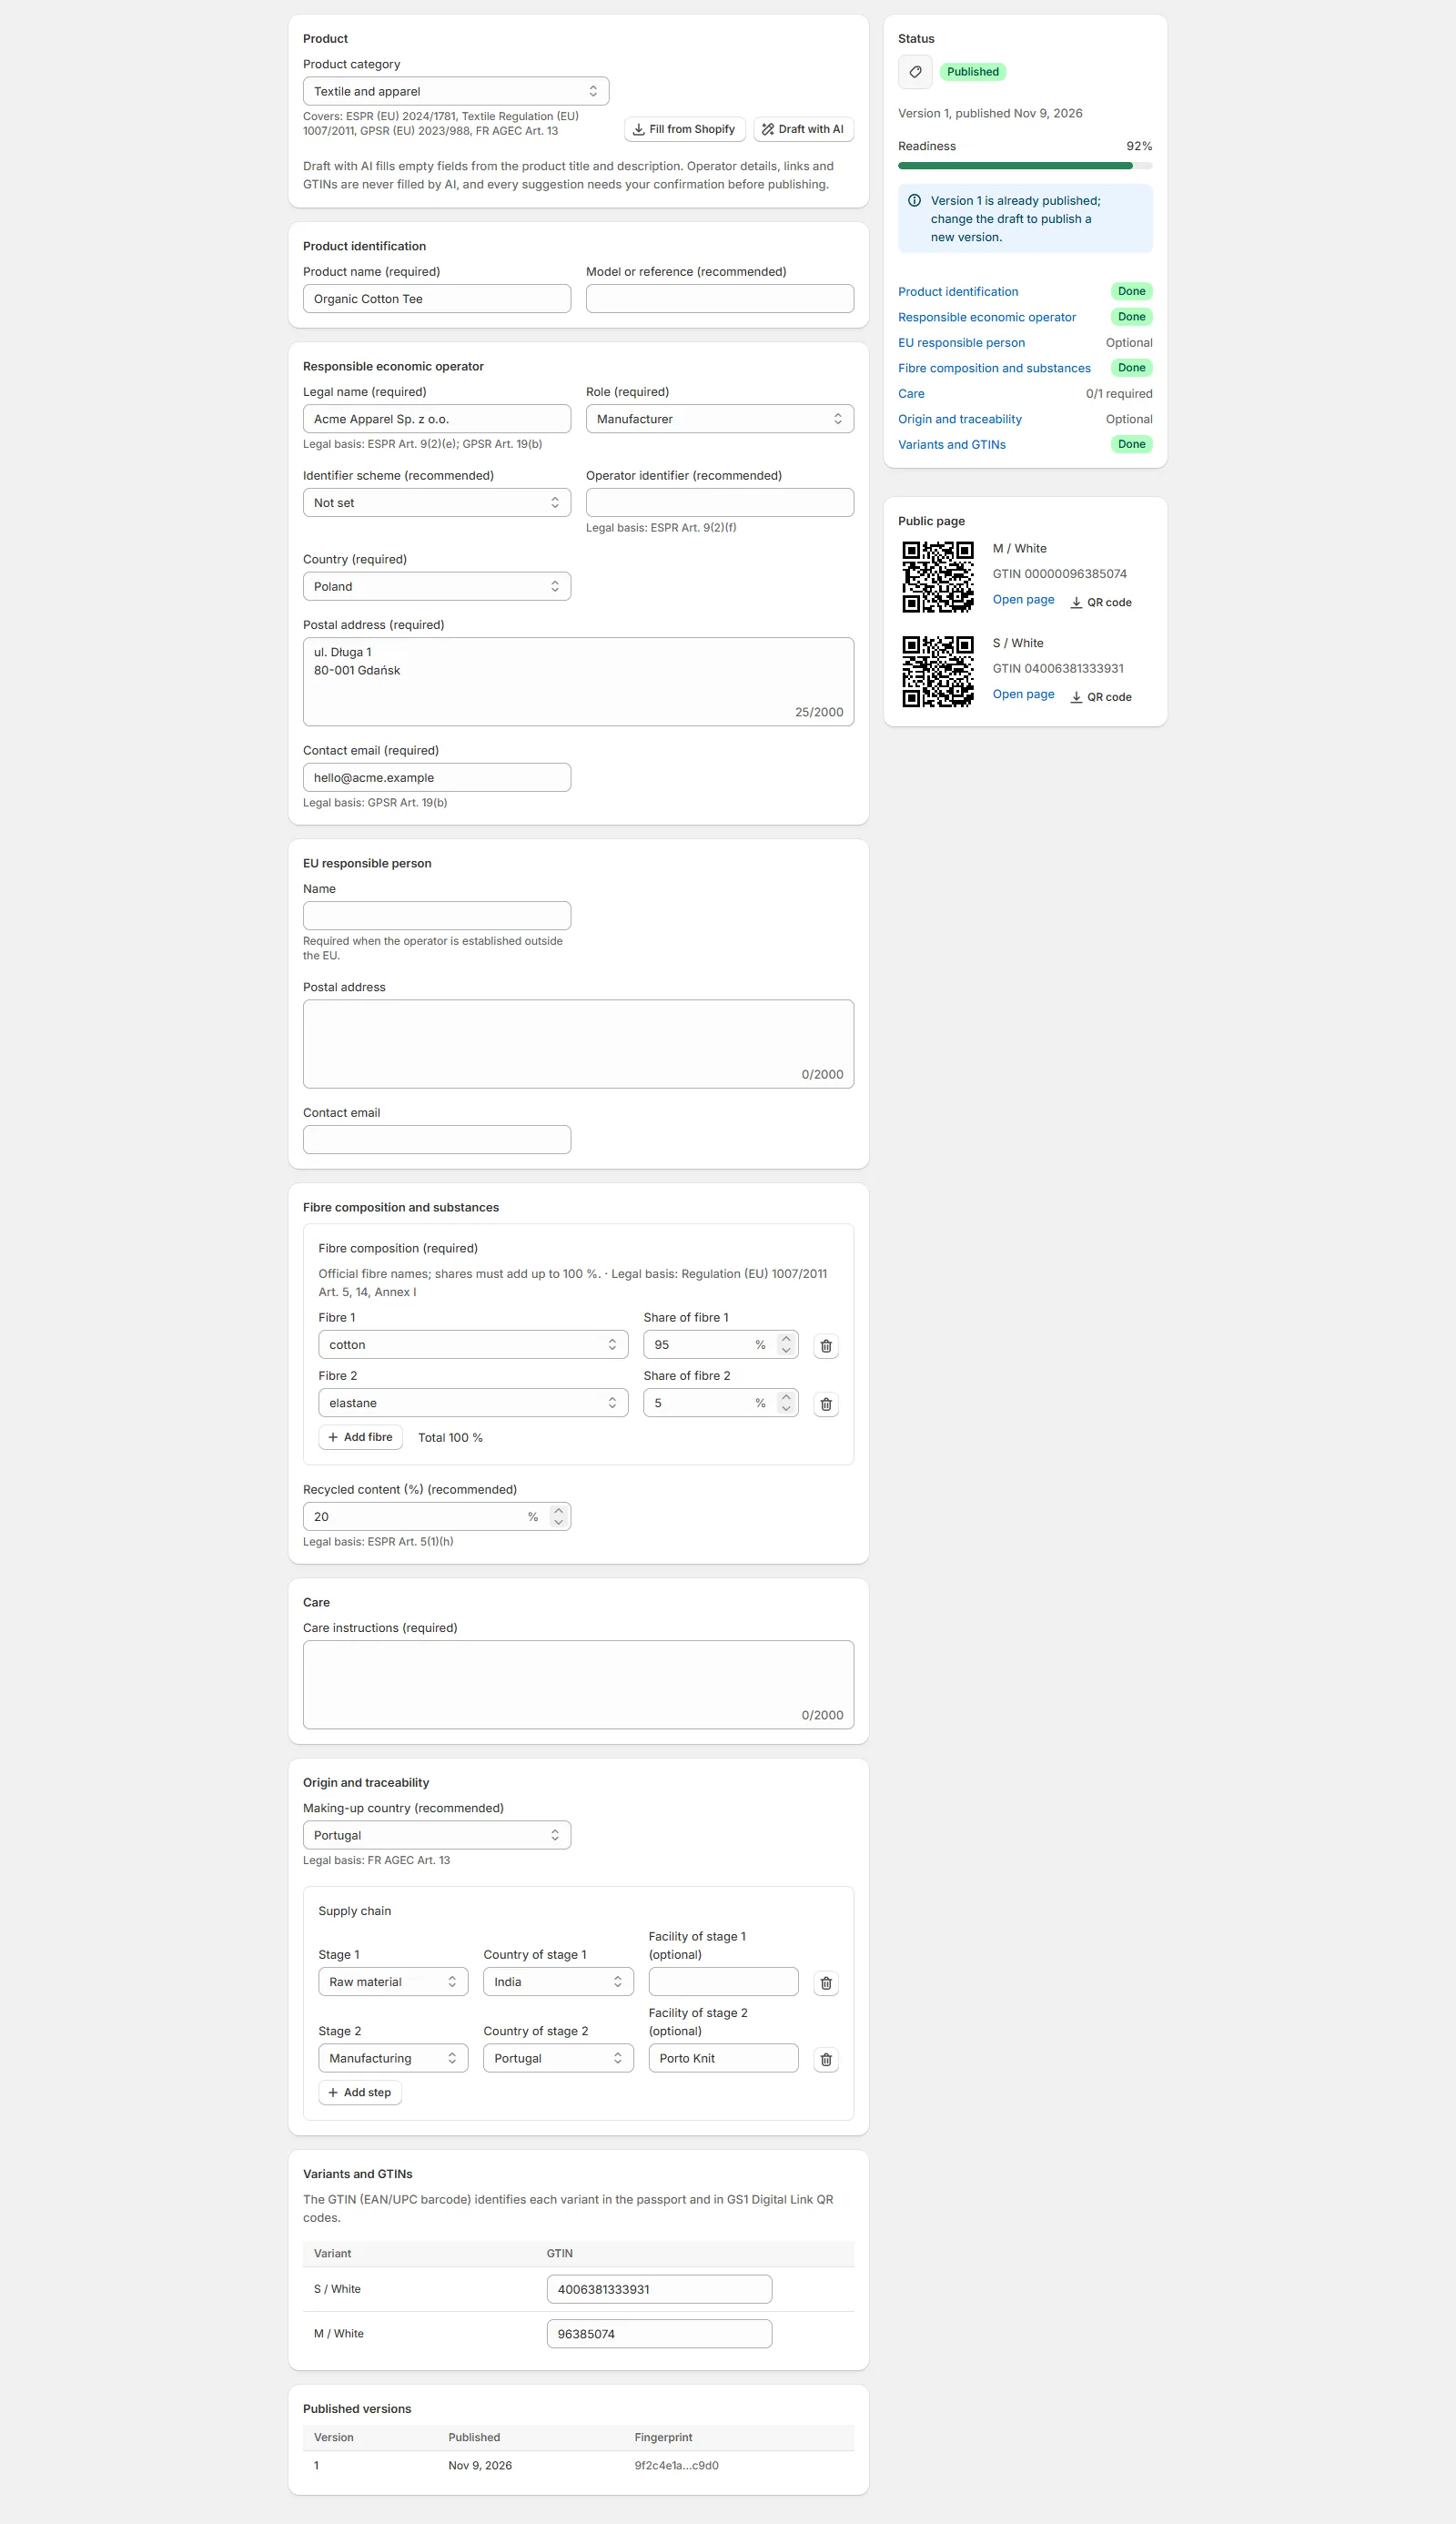
Each publication is a new version. Earlier versions stay on record under Published versions, and every version is sealed with a fingerprint of the previous one, so the history cannot be changed later. To publish a change, save the draft and click Publish again. Withdraw stops scans from showing the passport; you can publish it again later.
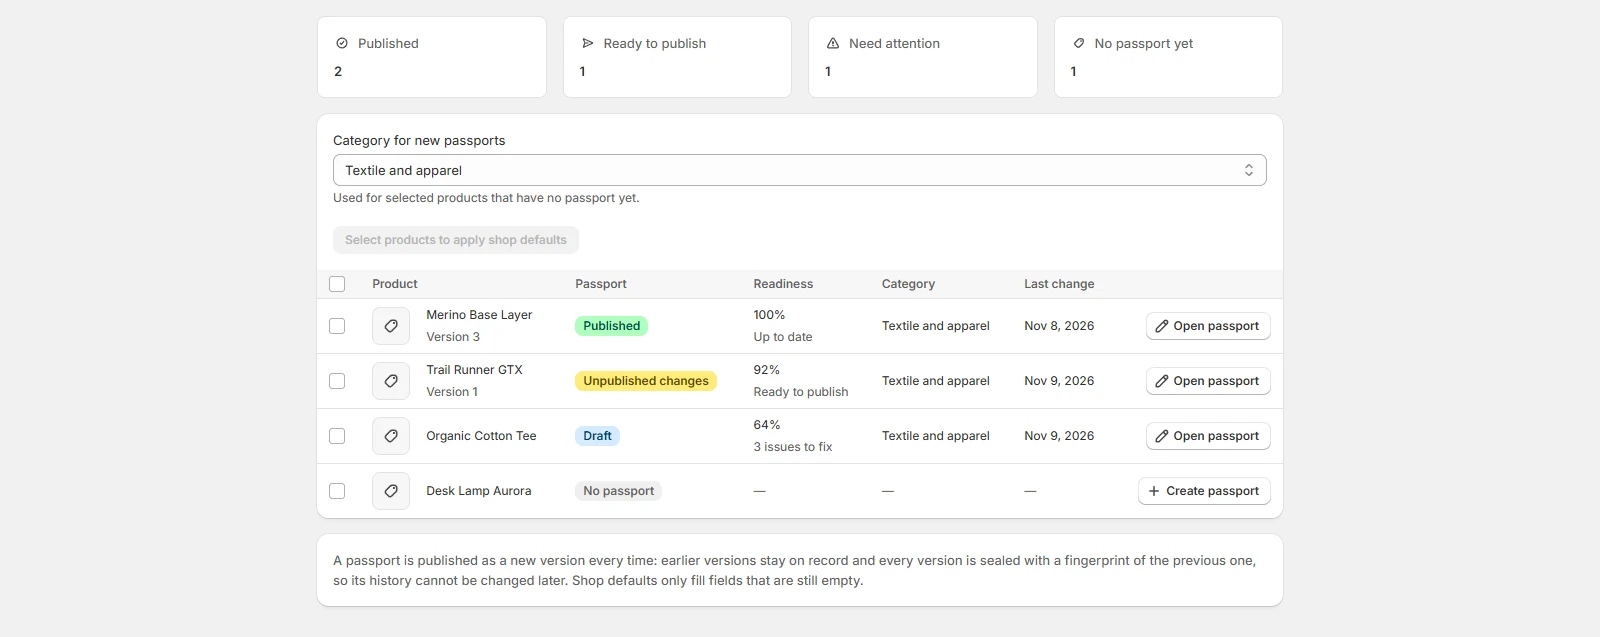
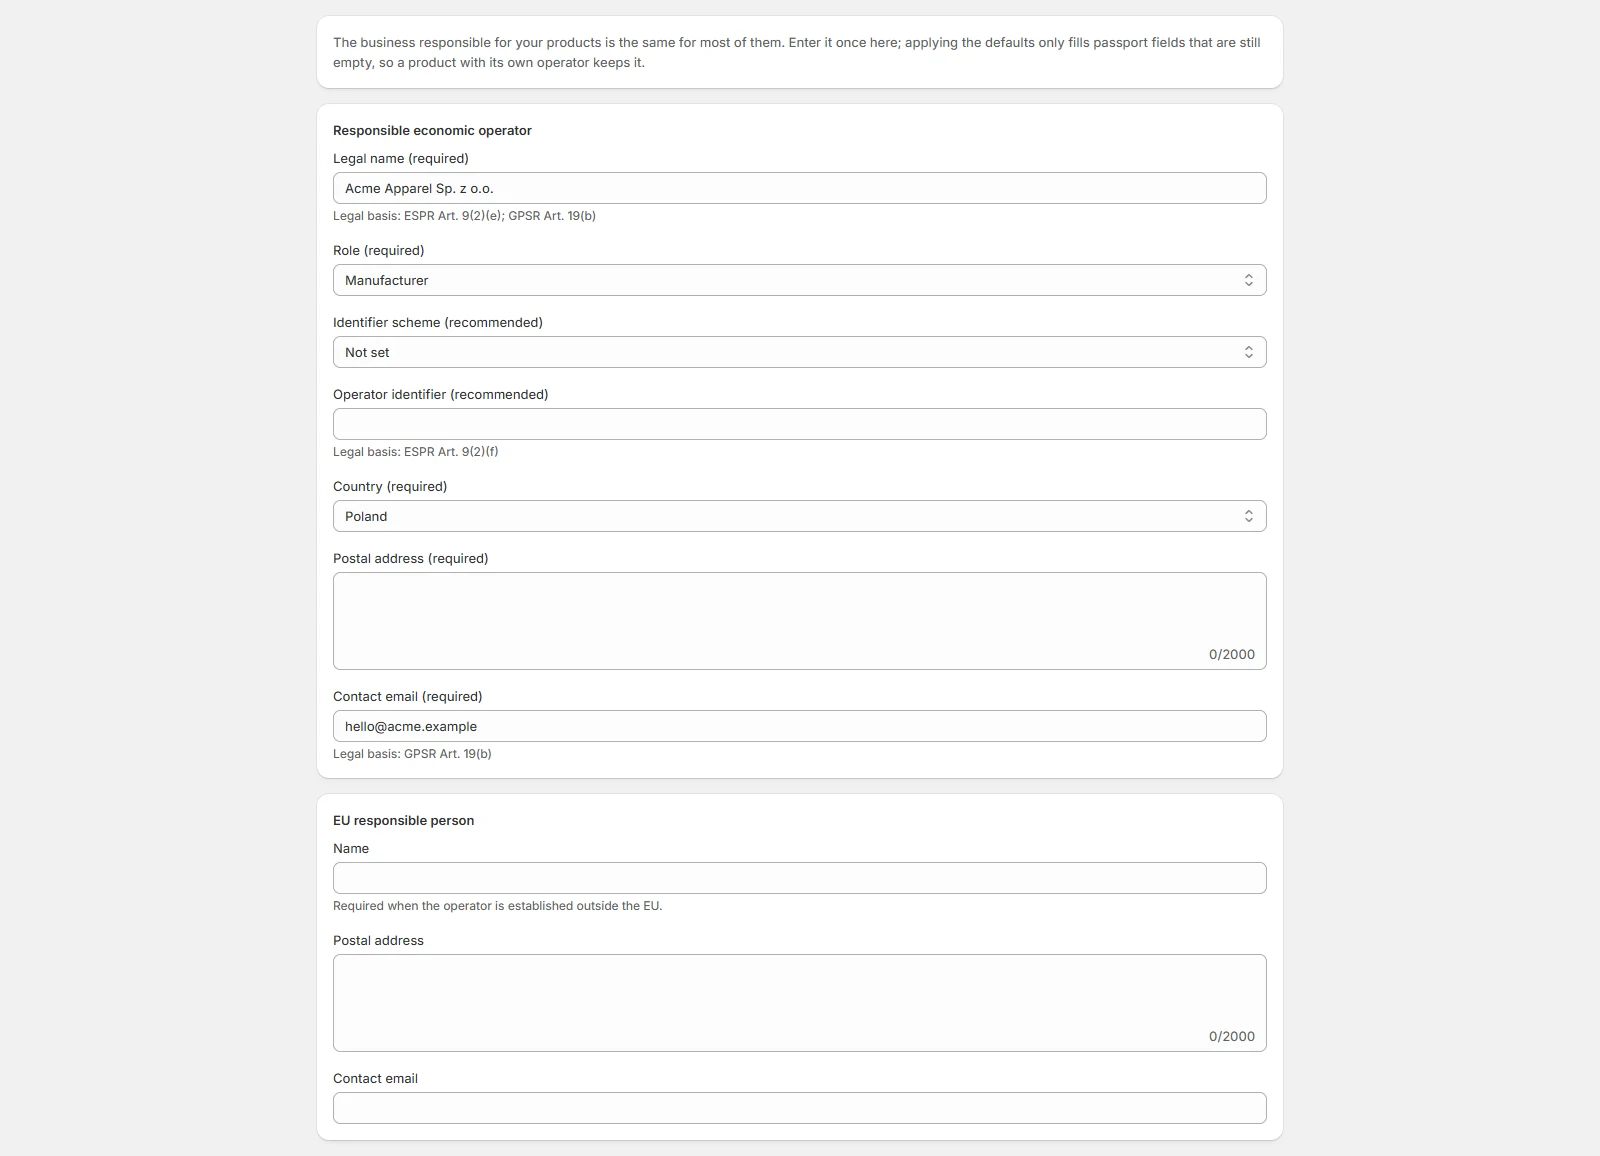
Shop defaults. The business responsible for your products is usually the same for all of them. Click Shop defaults, enter the Responsible economic operator (and the EU responsible person if your business is outside the EU) and click Save. Then select products on the passports list and click Apply shop defaults (up to 50 at a time). Products without a passport get one in the Category for new passports. Only fields that are still empty are filled, so a product with its own operator keeps it; the result lists every product that was not changed and why.
GTINs. Each variant's GTIN (EAN/UPC barcode) identifies it in the passport. A GTIN can belong to one published passport only; withdrawing a passport frees its GTINs. If a variant is deleted in Shopify, the next product update removes it from the draft; until then the passport shows it as deleted and cannot be published, or you click Remove next to it.
Draft with AI. Draft with AI fills empty fields from the product title and description, for example the fibre composition or the country where the product was made. It never fills the responsible business, the EU responsible person, links, email addresses or GTINs, and it never overwrites a value you entered. Save or discard your changes first; the button is not available while the passport has unsaved changes. Every value it fills is marked Suggested by AI and must be confirmed with Confirm value before the passport can be published. Drafts use your plan's AI allowance; if your plan does not include AI, the app says so.
Public page and QR codes. A published passport also has a public page for each variant with a GTIN, at your verification
address followed by /01/ and the 14-digit GTIN (a GS1 Digital Link). The page lists the passport sections, the variants and
the version with its fingerprint; apps and authorities can read the same data as JSON-LD. The page follows the
visitor's browser language (English, German, Spanish, French, Polish, Portuguese, Russian or Chinese; English otherwise); the
values you entered are shown as you entered them. The Public page section of
the passport shows each variant with Open page and a QR code button that downloads the QR code as an SVG for
labels, hangtags and packaging. The page always shows the published version; after Withdraw it says that the passport
is not available.
Show “Verify authenticity” on your store#
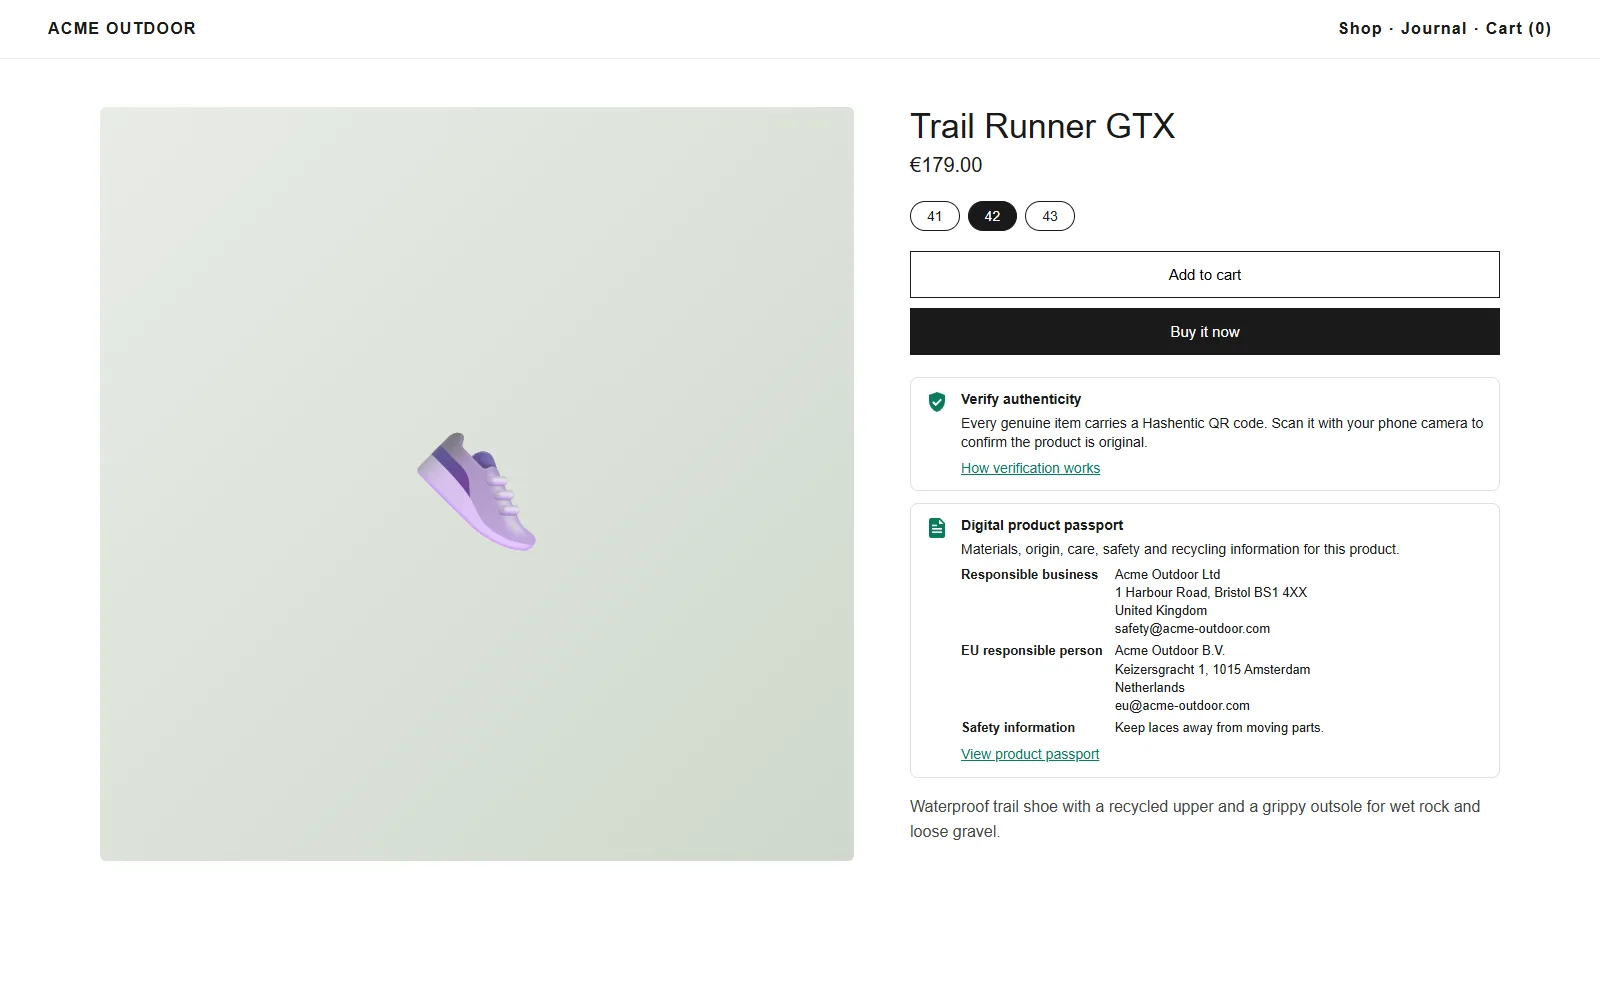
The quickest way is Open theme editor on the app's Home page: it opens your product template with the block ready to add. You can also add it by hand:
- In Shopify, open Online Store Themes Customize and go to a product page.
- Click Add block, choose Verify authenticity under Apps and place it near the buy button.
- Choose whether the block appears on Protected products only or All products, and save.
The block links to your verification site and explains how customers check a product. It is translated into English, German, Spanish, French, Polish, Portuguese, Russian and Chinese, runs no scripts and adds only its own small stylesheet to your pages.
In the theme editor the block is always shown, with a preview note when shoppers would not see it (the product is not protected, or Hashentic is not yet activated). The note never appears on your live store. The block text says that every genuine item carries a Hashentic QR code or NFC tag.
Product passport block. Add the Product passport block the same way. It appears only on products with a published passport and links to the passport's public page, so customers can read the materials, origin, care and safety information before buying. In the theme editor it is shown with a preview note on products without a published passport. The list of products behind the block is updated each time you publish or withdraw a passport.
With Show responsible business and safety information (GPSR) switched on (the default), the block also lists the responsible business, the EU responsible person and the safety information from the published passport, as the General Product Safety Regulation asks online shops to show them on the product page. To do this, the block loads the published passport from your verification site in the shopper's browser; nothing else on your page changes.
Plans and packs#
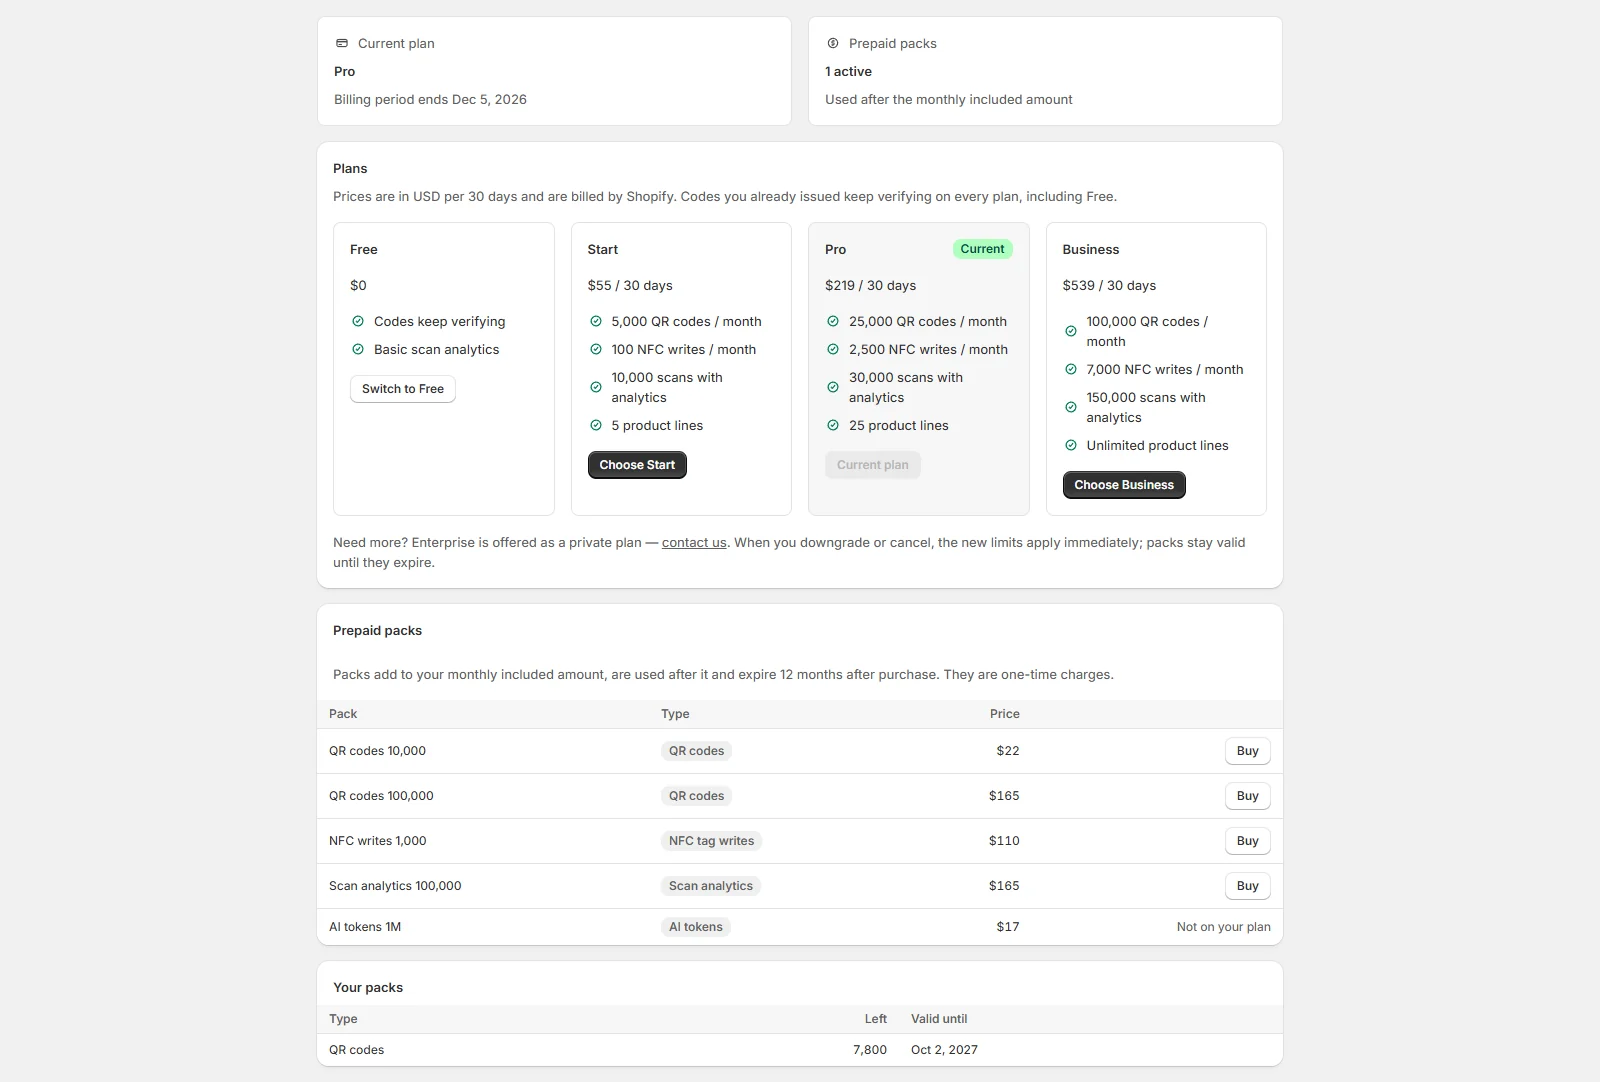
Open Plan and packs. Plans are billed by Shopify every 30 days in US dollars together with your Shopify bill; Enterprise is available as a private plan on request. Prepaid packs (QR codes, NFC writes, scan analytics, workflow runs, AI) are one-time charges, are used after the monthly included amount and expire 12 months after purchase. Packs need a paid plan that includes that pack type; during the trial such packs show Needs a paid plan. Only the store owner can change the plan or buy packs.
Choosing a plan and Switch to Free ask you to confirm first. Choosing a plan during the trial ends the trial: billing starts on the day you approve the charge in Shopify, and the plan's limits replace the trial's. When you downgrade, the new limits apply within a minute; scans of existing codes always keep working.
Uninstall#
If you uninstall the app, the Shopify subscription ends, your Hashentic account moves to the Free plan and the connection to Shopify is switched off. Your verification site and every code you printed keep working. 48 hours later Shopify asks us to erase the shop data: we remove every Shopify id and link, and the account remains yours as a plain Hashentic account. If you reinstall within those 48 hours, the app reconnects to the same account; after that, a new installation creates a new account. Either way you activate again and choose a plan again.
If a customer asks your store for their data after you uninstalled the app, Shopify forwards the request to us and we e-mail the store owner the codes linked to that customer's orders, so you can answer the customer. Once the shop data is erased (48 hours after uninstalling) we hold nothing for those orders any more; if the e-mail cannot be sent, our support answers you instead.